Let’s make a 2 version little pumpkin!!!

It will be a small and cute decoration but you can use a chunky yarn to make it bigger! I’ve used a mixed yarn, fine weight-sport and a 2,00 mm crochet hook but you can use any type of yarn you like and the recommended hook for your yarn.
The pattern is easy and it requires basic crochet skills.
Make the colour changes always in the last stitch.
Materials
Yarn in orange or pumpkin colour, purple, olive green, lime green, fuchsia and black
2mm crochet hook
8mm safety eyes
Yarn needle
Scissors
Polyester fiber fill for stuffing
Stitch marker or a piece of yarn to mark the beginning of every round
Abbreviations (US terminology)
mr- magic ring
ch- chain
st/sts- stitch/stitches
sl st- slip stitch
sc- single ctochet
hdc- half double crochet
dc- double crochet
p- picot stitch (ch 2 and sl st into the 1st ch)
inc- increase (2 sc in one st)
dec- decrease (sc 2 sts together)
Blo- back loop only
R-row
Rnd/rnds-round-rounds
FO- fasten off
[…] x…- repeat instructions within [ ] x … times
(…) – total number of sts in this rnd
Pumpkin (work in rows)
With orange
Ch 21
R1. Starting from the 2nd ch from the hook make 20 sc, ch 1 and turn (20)
R2. Blo 20 sc, ch 1 and turn (20)
R3-32. Repeat row 2

Fold the piece in half and make 20 sl st connecting the 2 sides by inserting your hook through the back loops of your sts on the top side and the sts of your beginning chain. Cut the yarn leaving a long tail for sewing.


Now take the yarn tail and with the help of your yarn needle go in and out in every row to gather the opening and close the top. Once you go through all the rows pull the yarn tail to close the hole. If you continue to have a little hole make a few sts more to secure and close completely the hole. Hide the yarn tail inside your work.
Insert the safety eyes in between 7-8 st counting from the open side up. They have to be 6 rows apart after putting them in.

Go on the open side, attach an orange yarn and ch 1
We will start working in rounds to close the open side (bottom side) of the pumpkin
Rnd 1. 32 sc around the opening, one in each row of your work
Stuff your work firmly to have a nice shape
Rnd 2. [2 sc, dec] x 8 (24)
Continue stuffing until the end
Rnd 3. [1 sc, dec] x 8 (16)
Rnd 4. Dec x 8 (8)


FO and close the hole by inserting the needle only through the 8 front loops of the last round. Pull tight to close the hole and hide the yarn tail inside your work.
Well done!!! You’ve just completed your pumpkin!!!
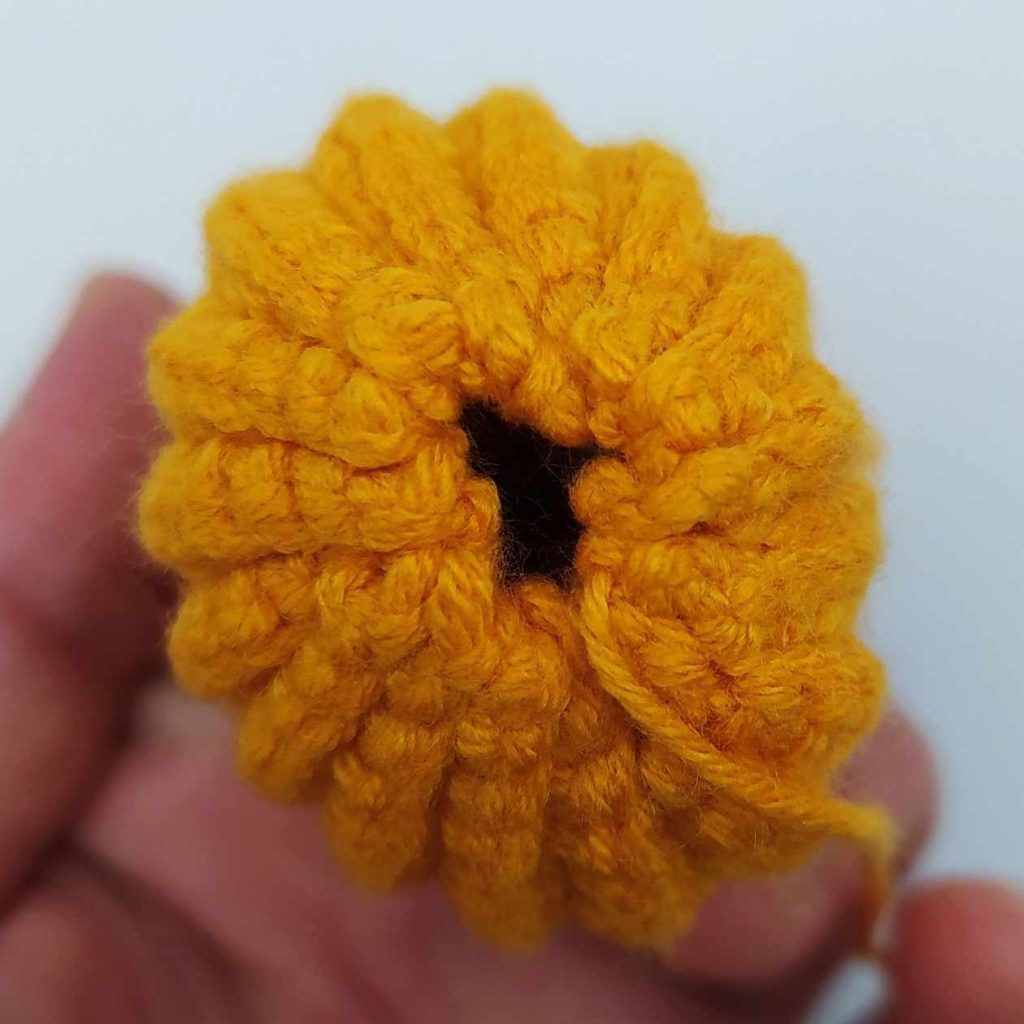
Witch hat
With purple
Rnd 1. 4 sc in a mr (4)
Rnd 2. [1 sc, inc] x 2 (6)
Rnd 3. 6 sc (6)
Rnd 4. [1 sc, inc] x 3 (9)
Rnd 5. 9 sc (9)
Rnd 6. [2 sc, inc] x 3 (12)
Rnd 7. 12 sc (12)
Rnd 8. [3 sc, inc] x 3 (15)
Rnd 9. 15 sc (15)
Rnd 10. [4 sc, inc] x 3 (18)
Rnd 11. 18 sc (18)
Rnd 12. [5 sc, inc] x 3 (21)
Rnd 13. 21 sc (21)
Rnd 14. [6 sc, inc] x 3 (24)
Rnd 15. 24 sc (24)
Rnd 16. [3 sc, inc] x 6 (30) Change to lime green
Rnd 17-18. (2 rnds) 30 sc (30) Change to purple
Rnd 19. 30 sc (30)
Rnd 20. [1 sc, inc] x 15 (45)
Rnd 21. [2 sc, inc] x 15 (60)
Rnd 22. 60 sc (60)
FO and leave a long tail for sewing
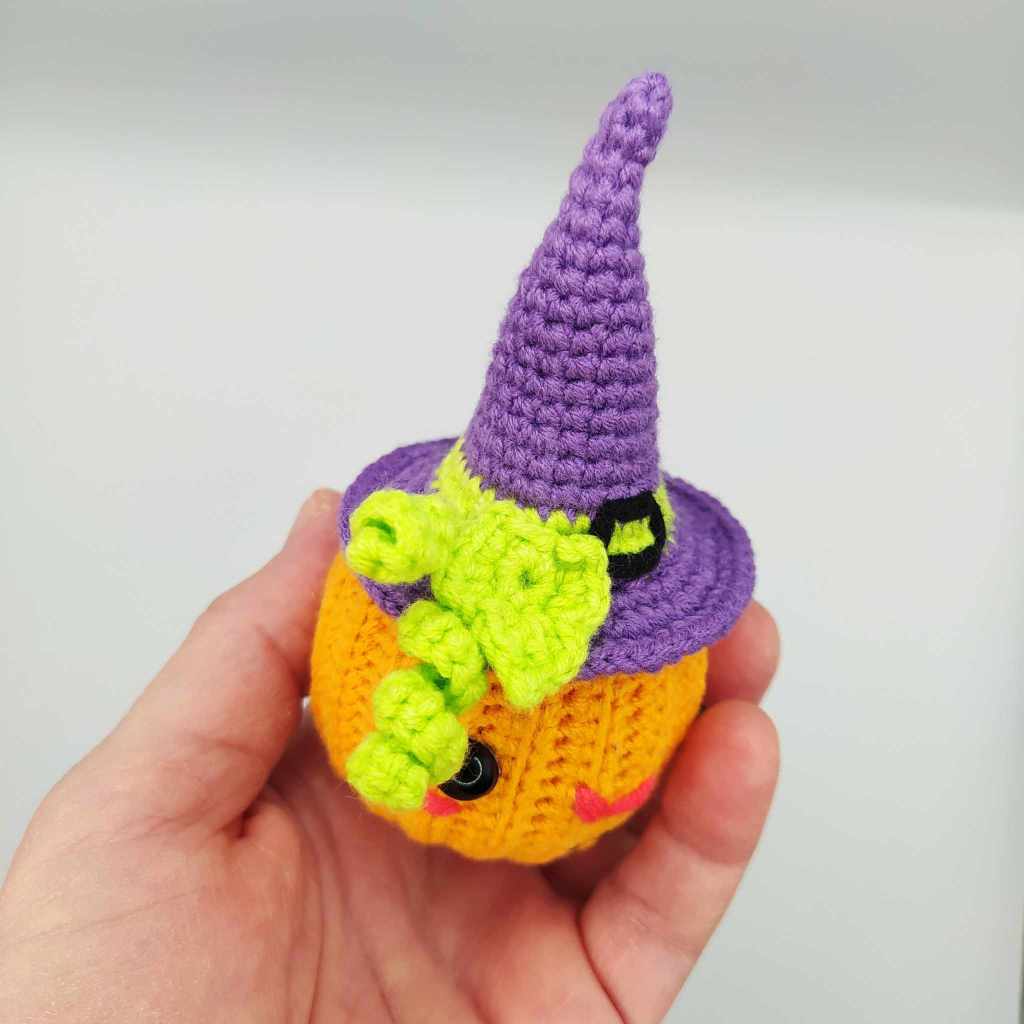
Take the black yarn and embroider the buckle as you see in the picture below.

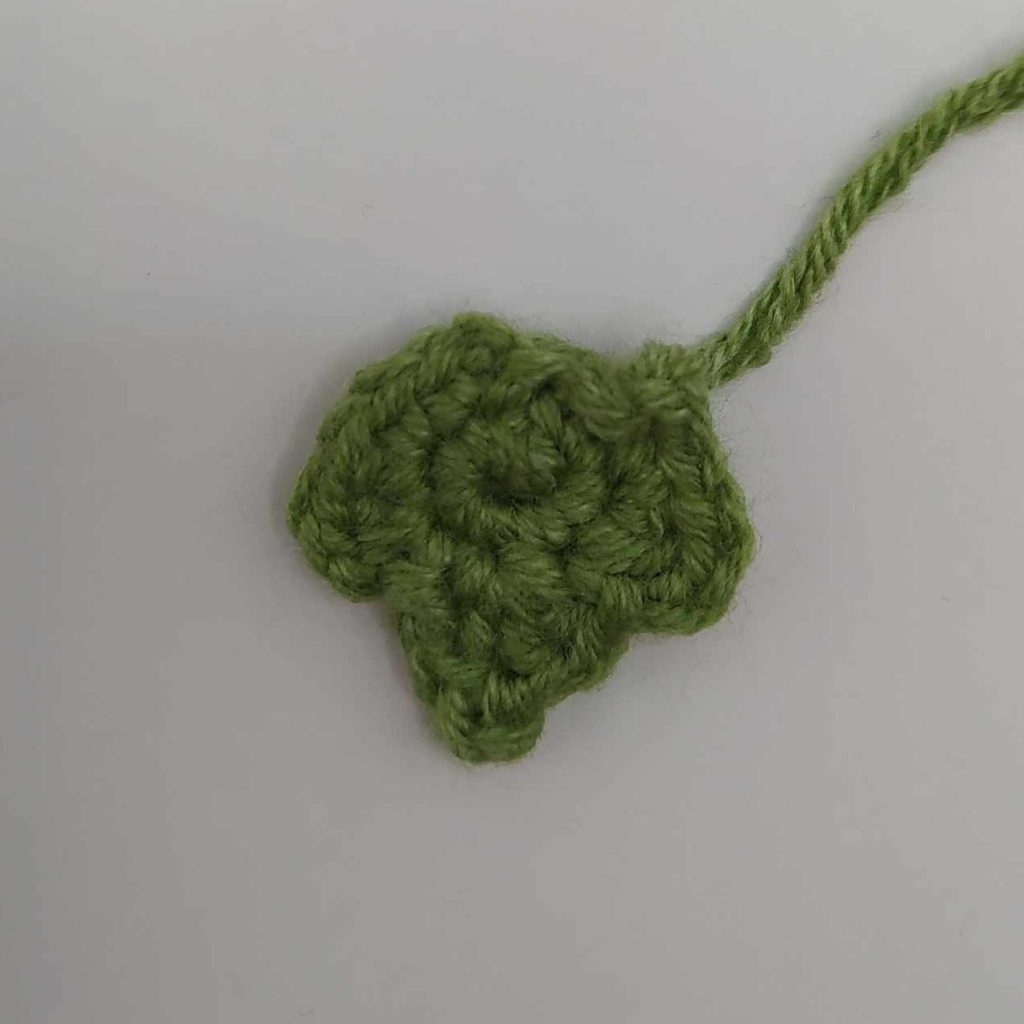
Leaf
With lime green
Stitches within […] are worked in one stitch
Rnd 1. 8 sc in a mr (8)
Rnd 2. [sl st, ch 2, sc], [sc, hdc], [dc, ch 2, sl st], [2 dc, p, 2 dc], [sl st, ch 2, dc], [hdc, sc],
[sc, ch 2, sl st]
Leave the last st unworked
FO and leave a tail for sewing.

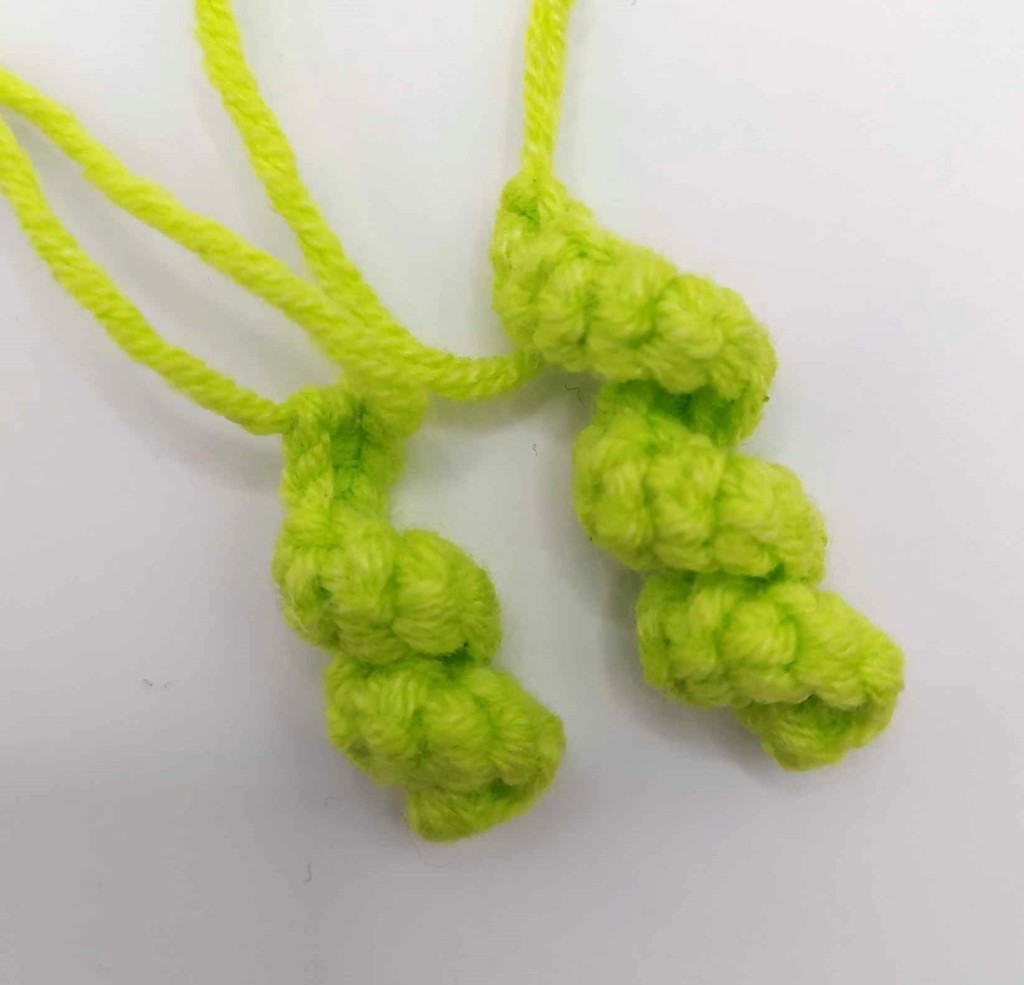
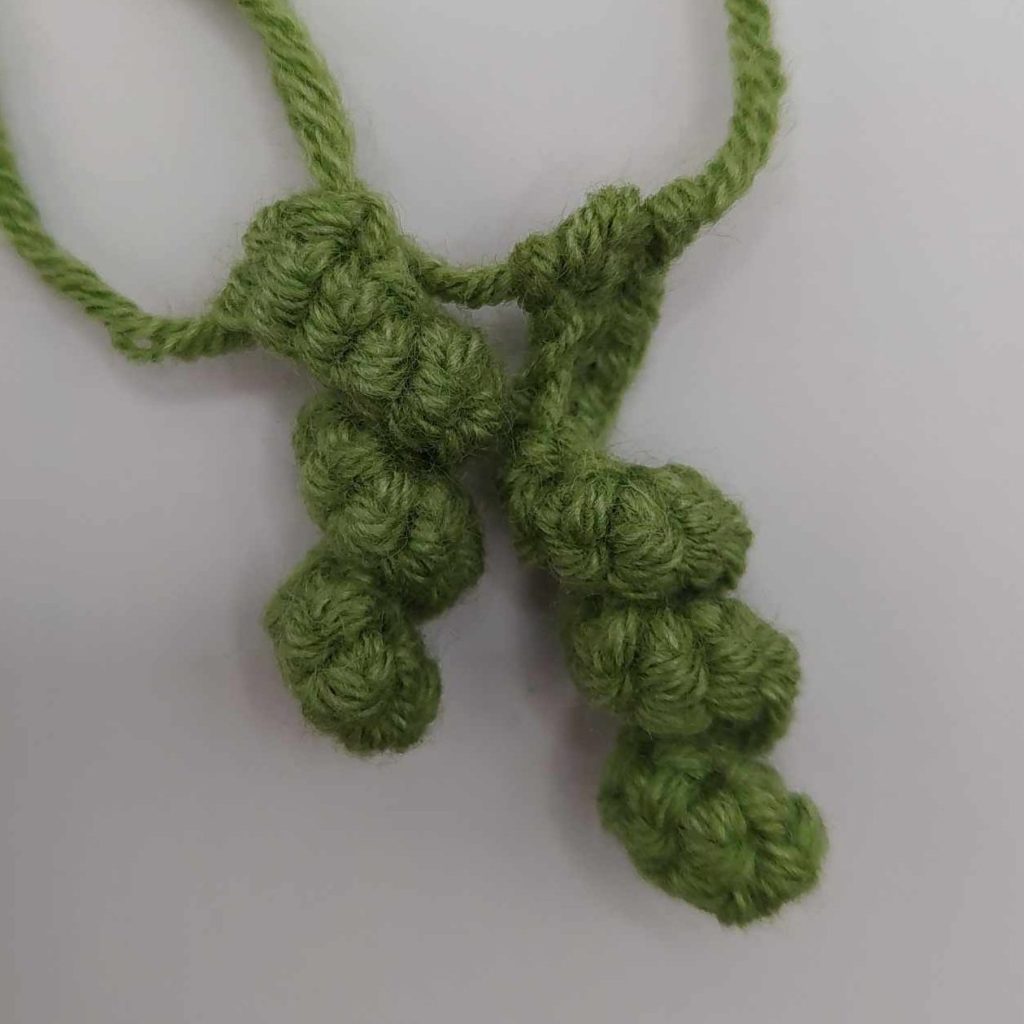
Big spiral
With lime green
Ch 15, starting form the 2nd ch from the hook make 2 sc in each ch.
FO and leave a tail for sewing.
Small spiral
With lime green
Ch 11, starting form the 2nd ch from the hook make 2 sc in each ch.
FO and leave a tail for sewing.
If you want to make the pumpkin without the hat you have to make a stem. Here’s how:
Stem
With olive green
Rnd 1. 6 sc in a mr (6)
Rnd 2-3. (2 rnds) 6 sc (6)
Rnd 4. [2 sc, inc] x 2 (8)
Rnd 5. [1sc, inc] x 4 (12)
Rnd 6. 12 sc (12)
FO and leave a long tail for sewing

To make the leaf and the spirals you will use the same above patterns. The only difference is that the pieces will be made with olive green.
Assembly (use the pictures as guidance)
For both versions the features of the face are the same. Take your fuchsia yarn and embroider the nose and under the eyes embroider two lines as cheeks.
Split the black yarn in half and embroider a little smile 2 rows below the nose.
For the witch pumpkin sew the hat a bit sideways between 19-20 rnds of the hat and the head and then sew the spirals first and then the leaf on the hat.
For the regular pumpkin sew the stem right on the center of the top side of the pumpkin and then sew the spirals first and then the leaf.


And your pumpkin is ready!!!
I hoped you liked my pattern and if you decide to try it don’t forget to tag me on Instagram @thebluebobbin so I can see your pumpkin and which version you chose to make!

Copyright ©2023 The Blue Bobbin. All rights reserved. This pattern is for personal use only. It may not be reproduced, sold, distributed or translated, published in any way. You can sell finished items provided that you credit "The Blue Bobbin" as the designer.

[…] Click Here […]
LikeLike